
I have seen gorgeous hand quilted works of art and am amazed, not only by their beauty in design, but awestruck by the patience involved. Someday, I want to make one. I also have a goal to make a quilt with a bagillion little squares like you see at department stores. So far, I have penciled in that project for when the shortest goes to kindergarten. I figure I deserve 6 months after they are both in school to hobby vacation & sleep. Ahhhh...
I thought I would walk you through the steps I did for this quilt. It is extremely easy, and if you put all the minutes together, without major disruptions, it honestly only took 2 -3 hours, tops.
First, I am making 2 toddler (crib) size quilts. The directions below are for ONE quilt. I measured our "moo-moo" bedspread (aka Cars movie, kids used to say "moo-moo" for movie, and it was the only one they would watch, I have it memorized beginning to end), and determined I needed about 54" x 43", give or take.
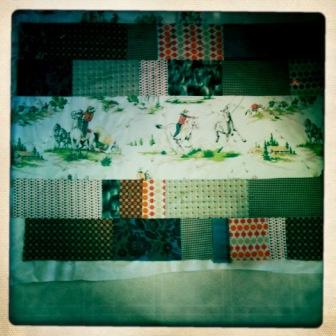
1. I used my rotary cutter and board to cut two 12" strips from the twin sized vintage cowboy sheet. I left the full width so I could line up the cowboy pics to my liking.
2. Then, I cut 6" strips, cheating by first folding the fabric in half, selvedge to selvedge, of the coordinating fabrics. I cut two strips each of the main colors I wanted to use and only one for my accent color.
3. I took each strip and cut them in various lengths. 12", 10", 6", 5", 4", 3". I didn't really think about it. I did plan to use some of the 6", rotated 90 degrees so I could have the pattern going left to right, instead of up and down. As long as I had some of the larger strips, I could always shorten them, if needed.


6. I took each pile, and sewed the pieces together, right sides together with a half inch seam allowance, forming the row. I did this for each, keeping them in order from top to bottom.
7. Moving to the ironing board, taking each row individually and flipping over, wrong side up. I ironed each of the seams open.


10. I took the bottom row and placed it on my dining room table. I let the fabric slightly overhang the edge. Above the row, I added the cowboy panel, lining up the cowboy pics as I wanted them.


Then, I flipped the cowboy row down over the bottom row.


The next step will be quilting all of the seams of each "box."
Well, that's only how far I have gotten. Its been waiting for me to quilt it since Saturday, I hope to have it (and its cohort) finished this weekend.


AWESOME! Can't wait to see it in person!
ReplyDelete