Showing posts with label sewing. Show all posts

Tuesday, August 31, 2010

Henry's First Day at Preschool Party


I did not cry. I welled up a little driving to school.  But... I did not cry.  I really wanted to after we arrived to the classroom and  it turned out Daddy + Mommy were the ones begging for goodbye hugs.  Henry, was raring to go. So, after hugs, we drove home, one carseat empty.


The Hubby left to go to work and Hunter and I whipped out some printables. We printed them in 5 minutes.  I drew them up over breakfast this morning, it took like10 minutes tops. Simple text. a star shape, all in PowerPoint.  Easy Peasy. A printable for the banner, printed in alternating blues, and two stars for the snack table and for Henry to wear. I also printed out "A is for Awesome Afternoon, B is for Brand New School, C is for Cool New Friends" but I didn't end up using it.

Then, we melted some butter and set to work on making cookies. Little box mix cookies as requested by the Honoree this weekend while shopping.  We make our own cookies about 99% of the time so these were a real treat, he didn't know when we were making them. Since I had 2 hours and 20 mins until I had to go back to pick him up, I was so greatful I had said yes to them. 5 mins later, in the oven baking.

While the cookies baked, I made the celery and carrot sticks.  A few extra for good measure, done. 12 mins. Second batch of cookies, I cut two blueberry bagels in quarters and then thinly sliced. Arranged on a pan, drizzled a little melted butter and sprinkled some sugar on top (Thank you Food Network Magazine snack insert.)  Popped in the oven right after the cookies came out. 12 mins.  

Ironed some cotton muslin (yes, I love it, I have a bolt of it and yes, I use it for everything!) and then back to the kitchen to flip the bagel chips over, more butter and sugar, and back in the oven.  10 mins.

Cut out fancy star for snack table label and badge. 5 mins.

I cut the yard of fabric into 3" by 10" rectangles with my trusty pinking shears. I cut out each letter from the transfer and ironed them on the garland. Then I ran some muslin colored twill tape through the machine and attached each letter flag with a zig zag stitch.  I folded each rectangle in half first and then slid the fabric around the twill tape. I sewed throughout the length of the garland to have one continous stitch line. This saves a ton of time over stopping and starting at each flag.  There is less to trim in the end, also.

The garland took a little more than an hour or so.  In the grand plan of reusing my garlands (notice the Father's Day chain garland above, too,) I can use this banner for any number of events. Next year, I will make a "SCHOOL" to replace "PRESCHOOL" for next year's back to school party.  Also, if I make a "BIRTHDAY" and pair it with "HAPPY" I just covered another event. Easy Peasy. 

When I finished the garland, I had 15 mins to spare before I had to leave and pick Henry up.  Popped a mini bag of popcorn in the microwave, set out some plates, arranged the snacks, added a cake plate of cookies, hung the garlands with tacks. Voila.  Got to school early.  Brought the Honoree home and he smiled BIG.  We decorated the cookies with the icing we bought for it & sprinkles.  I saved this task because the boys love this most of all.

Mission Accomplished! Party ready in 2.5 hours. It could have been fancier. It could not have been more special.

Friday, July 9, 2010

swag bunting DIY - part one

Want to make your own swag bunting?  It is easier than you think.  Ready, OK.  I was dreaming about gorgeous swag bunting last week on my pretend super awesome porch. I remembered that I just ordered some grey and white awning stripe fabric. It’s Two by Two by Michael Miller and I had found it while searching for the red and white carnival/circus theme fabrics for Ms. Emily. I thought I would make small buntings on a garland. Of course, I am obsessed with fabric way more than my obsession with paper, because fabric has so many more options, and it is soft and will NOT give me a paper cut. I choose to make this swag from fabric.


What do I need?

~one yard of your fave fabric
~iron on interfacing
~rotary cutters, straight edge and pinking
~cutting board
~bias tape
~needle and thread

Take your washed and ironed fabric and lay it out on a cutting board. I folded it in half for easier cutting. Cut 6” strips with straight edge rotary cutter. I followed the stripes line so that it would line up later on.

Place one strip, right side down on your ironing board. Cut interfacing into 6” by 36” sized strips.

Following the directions on the interfacing, place the rough side down on top of fabric strip. Iron, let cool, and remove the paper backing. Place your second fabric strip on top, wrong side down, lining up the edges (and stripes/patterns if necessary,) and iron. Now you have one stiffened strip of fabric. Perfect.

Place fabric strip on cutting board and trim both short ends with straight edge rotary cutter. Trim both long edges with the pinking edge rotary cutter.

Now fold, starting at one short end about ½ to ¾, in accordion style, down the entire length of the fabric strip. Press hard, you want crisp fold line.

It takes a while, a long while...

YAY! Now take thread a needle and stitch close to the top edge of the fabric strip, about in the middle of each fold. NOTE: at the first stitch and last stitch, make sure to make needle entry point very close to fold line.

Once you are through the entire strip, pull (gathering fabric) and stitch closed.

It should now look like a swag shape.


Take your bias tape and attach it to the top edges of the swag. The swag edges will be inside, with the bias tape on the outside.

Pin (or clothespin, sorry I got lazy) it in place. Sew a straight stitch along the length of the bias tape where the swag is attached.

Make one, three, five or as many as you like. There are a ton of options. To make them smaller, cut the width of the strip thinner and the length of the strip shorter.

The possibilities are endless. Part two of this will show an accordion star and variations on the swag design. 

Tuesday, June 1, 2010

Ironing Tricks and Cowboys + Rat Rods

Hope you had a lovely weekend! I didn't get nearly as much done as I would have liked for the Taylor St. Market (four days away! eek!) We went to a car show on Saturday, the boys' first ever.  I am biased, but every lady there thought my cowboys were the cutest ever! 

Now for a party trick, er...ironing trick. I hate ironing because I can never get all the wrinkles out.  I love you mom, but I don't think you knew how to iron.  Or if she did, she never showed me.  I have been doing my own ironing since I was 8.  Ok.  Only ironing when I had to, but still...  I might have ironed more if I knew this trick.  Disclaimer: I am probably the last person to learn this trick. 

INTRO:  I was chit chatting with the ladies at the yardage shop while purchasing my fabric.  I am going to make a floor length tablecloth for the folding table in my fair display. Folding tables are ugly, and I didn't like those poly-whatever they sell for trade shows.  I'm a girl who loves a straight stitch, and it's been months since I have sewn from a pattern anyways, so why start now? Exactly! Anyhoo, back to the story.  The ladies and I were discussing my bad ironing and they said "use a squirt bottle with water to get the wrinkles out." D-U-H  Holy cannoli, can it get any easier?  I always loved that squirt feature on the iron, but hated that I would use all my water for the steam function.  This trick works wonders for muslin, which has a knack for wanting to stay wrinkled.  So, there you have it.  A trick you probably knew anyway, or if you didn't...shhhhhh...I won't tell.

Friday, May 7, 2010

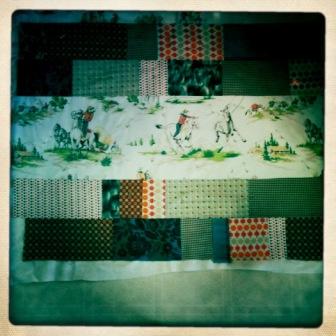
cowboy quilt


I did finish this.  Last weekend, I swear, before I started the etsy madness.  One quilt down, one to go.  I will probably have to go into Reno to find the chunky muslin for the reverse, or just use the buttery soft Kona muslin I was saving for my quilt (and save myself the money from browsing my favorite store).


The large orange dots are from Denyse Schmidt, I also have the yellow dot colorway and I think I will use that for Hunter's quilt.  It won't change the overall look, but will tie in the yellow quilt binding he picked out.  My littlest mini man chose his favorite color, and it is yellow. The big guy's fave has been blue since I don't know when, and I have been hinting for Hunter's to be red or lately I just get two blues to save an arguement.  So yellow...how perfectly fabulous and fitting to his personality.

Thursday, May 6, 2010

Hank + Hunt Etsy shop s O-P-E-N! Yay!

After running around yesterday afternoon, and after the already late dinner (to the dismay of the hubs), I finally got a few of my garlands listed.  Please visit my shop here. I am super excited and can't wait to make more.  I was so anxious getting the store open, and now I feel as if a weight has been lifted.  The little darlings are there, in all their glory, ready for the world.

Since, you may have noticed, I love garland and bunting, like a crazy person. I also love muslin for its pretty color and simplicity, why not use both?  Throw in a twist of ruffles for the perfect little garland that you can use again and again.  Bridal shower, check.  Wedding, check.  Mother's Day brunch for the new MIL, check.  Baby shower...what?  Going to fast for you? You could use this garland for years.  I am even going to test washability (I have two boys, you learn that you will have to wash EVERYTHING eventually), although the listed garland edges are pinked,  I am also working on a finished edge version.

Other goodies on the way for the shop?
1. hemmed edge version
2. gradual & bold colors
3. vintage fabric editions
4. pleated, crisp edition (in white, of course)
5. pom pom garland
6. magnets (see earlier posts)
7. handmade, small batch fabric ribbon

I am even working on a DIY to show you how to make these garlands.  Of course, I would love you to buy them, but I know some of you love to make your own, and I will share with you how!

So don't forget to visit me!


Friday, April 30, 2010

1, 2, 3...lovely luncheon

I needed some napkins, whipped out these bad boys from my favorite chunky muslin. Attempted to take a shortcut and fray out the ends, thinking it would be faster. So not the case. It would have been faster to finish them properly. They did turn out cuter this way. How'd I do it?

1) cut four 18" squares of fabric
2) sew a line/border about 1/2 an inch in from the outside of the edge, all the way around
3) pull out threads on the edges, this takes a while, but is so pretty it's worth it

Of course it will be a softer fuzzy edge when washed. Project takes about an hour, most of which is pulling out threads, which is soothing and satisfying.

Tuesday, April 27, 2010

cowboy quilts

I am almost finished with Henry's quilt.  It is layered, pinned and folded awaiting quilting.  The plan is to do simple long channels on the cowboy sections and similar width, but alternating directions, for each of the smaller squares.  I think quilting is the hardest part of quilting.  Well, its not particularly hard (especially if you ONLY do straight stitches, like me) just very dull.  I find it more satisfying to get the top all sewn together.  Then you can truly see your quilt for the first time.

I have seen gorgeous hand quilted works of art and am amazed, not only by their beauty in design, but awestruck by the patience involved.  Someday, I want to make one.  I also have a goal to make a quilt with a bagillion little squares like you see at department stores.  So far, I have penciled in that project for when the shortest goes to kindergarten.  I figure I deserve 6 months after they are both in school to hobby vacation & sleep.  Ahhhh...

I thought I would walk you through the steps I did for this quilt.  It is extremely easy, and if you put all the minutes together, without major disruptions, it honestly only took 2 -3 hours, tops.

First, I am making 2 toddler (crib) size quilts. The directions below are for ONE quilt. I measured our "moo-moo" bedspread (aka Cars movie, kids used to say "moo-moo" for movie, and it was the only one they would watch, I have it memorized beginning to end), and determined I needed about 54" x 43", give or take. 

1.  I used my rotary cutter and board to cut two 12" strips from the twin sized vintage cowboy sheet. I left the full width so I could line up the cowboy pics to my liking.

2.  Then, I cut 6" strips, cheating by first folding the fabric in half, selvedge to selvedge, of the coordinating fabrics. I cut two strips each of the main colors I wanted to use and only one for my accent color.

3.  I took each strip and cut them in various lengths.  12", 10", 6", 5", 4", 3".  I didn't really think about it.  I did plan to use some of the 6", rotated 90 degrees so I could have the pattern going left to right, instead of up and down. As long as I had some of the larger strips, I could always shorten them, if needed.

4.  I measured out about 44" and started laying out the gene stripes.  Mix and match, switcheroo, I changed it around until I was happy.  Then I took a picture, just in case something goes crazy awry, so I can always look back.

5.  I gathered each piece of stripe from left to right, and clipped them together as a row. Then, I stacked the rows from top to bottom.

6.  I took each pile, and sewed the pieces together, right sides together with a half inch seam allowance, forming the row.  I did this for each, keeping them in order from top to bottom.

7. Moving to the ironing board, taking each row individually and flipping over, wrong side up. I ironed each of the seams open.
8.  Then I took the first two rows and placed them right sides together, sewing the two rows together to form one wide row. I repeated this for each pair of rows, making 3 large rows (top, middle, and bottom.)
9. Pressed the seams out (just like #7) for each row.

10. I took the bottom row and placed it on my dining room table. I let the fabric slightly overhang the edge.  Above the row, I added the cowboy panel, lining up the cowboy pics as I wanted them. 

Then, I flipped the cowboy row down over the bottom row.
11.  Sewed the two rows together.  I returned the sewn bottom section to the table, lined it up and added the middle row.  Sewed together. Then, the top cowboy panel, and finally the top row.
12.  I trimmed the excess fabric from the cowboy panels.  I ironed all the seams away from the cowboy panels and towards the gene striped rows.  It was my personal preference, since the cowboy fabric was light ivory and I just don't like seeing the seams under the fabric.

13.  Now the fun part.  I had a large piece of chunky nubby muslin (very cowboy, no?) just under two yards long, and I only needed about 54", so I totally lucked out, yay.  Since it was just regular width (44/45") it was perfect, no sewing required.  I swept my kitchen floor, laid out the muslin wrong side up, laid out a pack of crib sized batting (45" x 60", 80/20 cotton/poly blend) on top, and then laid on the quilt top, right side up. 

14.  I carefully flattened it out and pinned the cannoli out of it.  Yep, the key to good quilting is safety pinning all three layers together, from the center out.  I put pins almost every 5" inches, just so it doesn't move at all, other wise my quilts end up getting wrinkled at some point. 

The next step will be quilting all of the seams of each "box."
Well, that's only how far I have gotten.  Its been waiting for me to quilt it since Saturday, I hope to have it (and its cohort) finished this weekend.