Showing posts with label fabric. Show all posts

Wednesday, November 24, 2010

Canvas and Canopy DIY

The Canvas and Canopy blog is amazing. All the gorgeousness that once was ilovelolliblog has been loaded into Canvas and Canopy's archives.  I've been meaning to share this DIY with you!  I was looking over my posts and I saw this little lovely never posted.  About  a month late.  Naughty Jenny. I blame dialup, but you can blame me. Here you go, a little treat for the long weekend!

When Cortnie asked me to do a party goodie tutorial for all of her lovely readers... I shrieked with joy.  I just about fell out of my chair. So here it is! My little lovely cake banner tutorial. Go visit Canvas and Canopy and learn how to make one, too.  Thank you, Cortnie!

Monday, November 1, 2010

POTTER + BUTLER GRAND OPENING EXTRAVAGANZA

It is my pleasure to introduce you to a lovely NEW little shop named POTTER AND BUTLER

HOORAY for TODAY!!! I’ve been beside myself to share this little lovely bit of information with you. I’m sure you’ve seen this little wonder on Etsy…Potter and Butler is NOW OPEN for business. They have only been with us for a few days, but they already feel like old friends.


When I was reading one of my favorites, Hello!Self, a blog authored by Emily Horak, I noticed she was opening up shop in the handmade world of Etsy. It just seemed so natural that she, too, would join the marketplace, being an advocate for handmade memorable celebrations. I did a little happy dance in my chair and emailed her ASAP… begging her to let me feature the shop! She said “YES” and I did another little dance. I was so excited for her new endeavor and dying to know all the details (and see the new pretty party products!) The blogosphere is brimming with party talent and beautiful photos, but what makes Emily special is her devotion to “authentically-merry celebrations.” I knew she was going to be a hit and I had to tell you about it.


First, I must share her lovely blog. At Hello!Self, Emily brings her incredibly contagious merry outlook to her readers. She seeks all the wonderful things related to create meaningful and lovely moments. She is friendly, kind and fabulous! Emily offers guidance that goes well beyond the reaches of traditional party planning. She is a CELEBRATION COACH, which is a combination of “event planner + life coach + creative merriment pusher,” and I just think that HAS to be the coolest job ever. Her blog makes me smile and is genuine, which is rare these days. For me, Hello!Self is a beautiful reminder that everyday moments are celebration worthy.

Emily and her dear friend Carrie Flynn have opened up Potter and Butler to share their love of merriment and crafting with all. Two friends, who met in the design field, have been creating pretty fetes (one of their favorite pastimes) and created these lovelies for their clientele’s parties. The overwhelming love they received for the designs and requests for personalized, meaningful décor, prompted the two to open Potter and Butler: handmade goods for merry celebrations. Currently in their pretty little shop are: (I HAVE to quote Emily on her descriptions…too perfect)

Gracious Garlands: sweet and airy fabric pom garlands that sway to the beat of your fete or to the flow of your home

Cake garlands: a petite version of the gracious garlands – perfectly sized to adorn the celebration cake.

Morsel Adornments: Includes monogram toppers in vintage fonts, classic silhouette toppers, convey toppers (allowing you to customize a message for each topper), and Peppy Toppers, which are the food pick manifestation of our poms.

The Embellish: a modern twist on the days when grandma wore a corsage on special occasions. It’s a lush fabric corsage that says, “For me, there is significance to this moment.”

Merry Poms: The centerpiece for merriment. Reminiscent of a lush cluster bouquet, made with over two yards of fabric.

I Belong Pom: Let guests know they belong – and exactly where at the dinner table – with our take on the place card

Gift Wrap Embellishment: Our modern version of the traditional gift bow. Made of fabric, it can be part of the joy of gift giving time after time.

For Him Pom: something for the fellas - fabric boutonnieres

Sweet Notes and Good Fortune Poms- It’s a good life. And there’s lots to celebrate. Our sweet notes and good fortune poms send guests off with a sweet sentiment or fortuitous good will . Perfect as celebration favors or small gifts.


Emily and Carrie were so excited about their new shop they opened early, TODAY was to be their official grand opening. So, in GRAND Potter and Butler style…we shall CELEBRATE! Potter and Butler is holding its FIRST EVER GIVEAWAY here. Yep...I am incredibly excited, (beyond excited, really) to announce that you can win TWO GRACIOUS GARLANDS of your very own.
Winning is EASY!!! Enter FIVE times!!! Leave a comment here for each of the following:

1. Go to the Potter and Butler shop. Pick your fave. Tell us here.
2. Follow Hank + Hunt (here)
4. Follow @hankandhunt on Twitter
5. Follow @PotterandButler on Twitter

How awesome is that? FIVE chances.  You know I would enter if I could...

COME BACK WEDNESDAY for my interview with Emily of Potter and Butler, more eye candy, and more ways to win...it'll be worth it.  I promise.

Friday, July 9, 2010

swag bunting DIY - part one

Want to make your own swag bunting?  It is easier than you think.  Ready, OK.  I was dreaming about gorgeous swag bunting last week on my pretend super awesome porch. I remembered that I just ordered some grey and white awning stripe fabric. It’s Two by Two by Michael Miller and I had found it while searching for the red and white carnival/circus theme fabrics for Ms. Emily. I thought I would make small buntings on a garland. Of course, I am obsessed with fabric way more than my obsession with paper, because fabric has so many more options, and it is soft and will NOT give me a paper cut. I choose to make this swag from fabric.


What do I need?

~one yard of your fave fabric
~iron on interfacing
~rotary cutters, straight edge and pinking
~cutting board
~bias tape
~needle and thread

Take your washed and ironed fabric and lay it out on a cutting board. I folded it in half for easier cutting. Cut 6” strips with straight edge rotary cutter. I followed the stripes line so that it would line up later on.

Place one strip, right side down on your ironing board. Cut interfacing into 6” by 36” sized strips.

Following the directions on the interfacing, place the rough side down on top of fabric strip. Iron, let cool, and remove the paper backing. Place your second fabric strip on top, wrong side down, lining up the edges (and stripes/patterns if necessary,) and iron. Now you have one stiffened strip of fabric. Perfect.

Place fabric strip on cutting board and trim both short ends with straight edge rotary cutter. Trim both long edges with the pinking edge rotary cutter.

Now fold, starting at one short end about ½ to ¾, in accordion style, down the entire length of the fabric strip. Press hard, you want crisp fold line.

It takes a while, a long while...

YAY! Now take thread a needle and stitch close to the top edge of the fabric strip, about in the middle of each fold. NOTE: at the first stitch and last stitch, make sure to make needle entry point very close to fold line.

Once you are through the entire strip, pull (gathering fabric) and stitch closed.

It should now look like a swag shape.


Take your bias tape and attach it to the top edges of the swag. The swag edges will be inside, with the bias tape on the outside.

Pin (or clothespin, sorry I got lazy) it in place. Sew a straight stitch along the length of the bias tape where the swag is attached.

Make one, three, five or as many as you like. There are a ton of options. To make them smaller, cut the width of the strip thinner and the length of the strip shorter.

The possibilities are endless. Part two of this will show an accordion star and variations on the swag design. 

Thursday, June 17, 2010

Father's Day Chain Garland DIY


Hello! In celebration of Father's Day, the boys and I made this little fabric chain.  The chain is just like those cool paper ones we made in kindergarten, except I used fabric so its softer and more durable for reusing. It's more "manly" than my usual garland, boys need love, too. It took about 1.5 hours total (time including interruptions by two mini men.)  Ready? Great...

What you will need:
~roll of WonderUnder (regular weight paper-backed fusible web)
~four (or more) half yard pieces of coordinating fabric - 18" x 44"
~iron
~ironing board
~pinking shears or my favorite pinking bladed rotary cutter (could_not_live_with_out)
~ruler (I regularly use a yardstick)
~cutting board (if using rolling cutter)
~sewing machine

Step 1:
Stretch out fabric piece wrong side up on ironing board.  Iron out wrinkles, if any.
Cut out a sheet of WonderUnder about 18" x 22" . 

Follow the directions for your fusible webbing.  Place rough side of webbing down on the left half of your fabric piece. Iron as directed.  Let cool.  Peel back paper, interfacing should stay, if it is ripping up, place paper carefully back down and reiron. 


Step 2:
Fold fabric over in half, so right sides stay together. Iron as directed.  You now have a stiffened piece of fabric with no wrong sides showing. 

Repeat steps 1 + 2 for all pieces of fabric.

Step 3:
Place fabric on cutting board and square up edges with rotary cutter. Fabric should be about 9" wide on the shortest side.


Step 4:
Line up yardstick with edge (9"side) and using the rotary cutter, cut fabric on opposite side of yardstick.

Repeat down the length of the fabric piece.  You will now have strips of fabric, all pinked and cute, about 1.25" x 9". Repeat for all pieces of fabric.


Step 5:
Make your first link.  Take a strip and curve up into a circle, overlapping edges abut 3/4". 

Using your sewing machine's zigzag stitch the edges together. 

Slip the second strip (of a different fabric) through the center of the circle.  Stitch and repeat.  and repeat.  and repeat.  Until your chain is your desired length. 


Step 6: (Optional)
Cut two pieces of twill tape about 1.5' long.  Tie on each end of chain.  You could sew if you wanted, too.


Viola! Enjoy! Hang it up and marvel at its cuteness, then hide it away for Sunday's celebrations!

Tuesday, May 11, 2010

Taylor St. Market - Reno

So, Sunday was Mother's Day, and after being brought the paper, I turned to the Horoscope section. Yes, I read them, to the dismay of my brother "how can a fortune possibly be for the millions born that month?" to which I reply, "it rotates people, someday, it will be my day." A habit of mine, and I just like it for laughs, but sometimes coincidence really happens. 

As it did on Sunday.  From the Reno Gazette, "If there's something your selling, you'll be getting some interesting leads.  And even if you don't have concrete goods and services to market, you will be winning people over with your ideas and personality."  Shortly thereafter, I checked my email, and there it was, an Etsy convo from Pickled Tink, inviting me to join the Taylor St. Market on June 5th in the Midtown area of Reno.  YAY! Someone, that I don't know, likes my stuff! Yippee!  See, coincidence or not, that fortune was pretty right on.  Of course, I saved it for my brother.  hee hee hee.

But this street fair couldn't be anymore perfect for me as my first real event.  The theme is "Vintage Inspired and Insanely Cute Stuff."  Hello...yes, perfect! The lovely ladies hosting the market?  Pickled Tink, a super adorable blonde (you should see her engagement photos on her blog) that has a lovely vintage shop with all the shabby chic trimmings a girl could want.  Creamy whites, yes, rusty chippy stuff, yes, so perfect.  I have always wanted to go in there, but not the shop for two mini men...(that I always have on my trips into town)...sigh.  Don't even get me started on 41Taylor. A deliciously charming house, made just for parties.  Gorgeous.  I want to live there!  Just wait and see.  One day, I vow to get a real photo shoot done of the girls (garland) there. 

So pardon me, while I do my little happy dance!

Monday, May 10, 2010

can you put sprinkles on chocolate chip cookies?

Yes.  Yes, you can.  I am starting to think you can put sprinkles on anything.  It was Mother's Day weekend, what is with all the red, white and blue, you ask...well, it was my boys' best friend, WD's birthday party on Saturday.  I made him a special birthday boy garland, which we girls love, but (note to self) I still need to boy it up a bit.  It was darn cute though.  I found two of the cutest pillowcases at the thrift store, in the classic reds and blues that are those wonderful vintage colors from way back when.  I had to have them for garland. 
I paired the vintage strips with bleached muslin and made them slightly smaller in width than the standard garlands. The recovered fabric made three total garlands, one for Willie (well, really Ms. Dylan), and two more, of which are so darn cute I'm not sure if I will part with them.  But, maybe if you ask really nice, I will sell or even giveaway one for Memorial Day. 

Anyhoo...back to the cookies...I took my trusty Mrs. Fields cookie recipe here, and used my 1" cookie scoop, and rolled the tops of each scoop into a plastic tub of patriotic sprinkles ala Target. 

Gosh, I love the dollar bin.  I should do a post about the wonders of the Target dollar bin, it's like the dollar store, but filled with stuff you actually want.  The same can be said for the Michaels dollar aisle...I digress...again. 
Cook exactly like you would sans sprinkles.  Voila, and yes, they were delicious.  I learned that you can decorate a chocolate chip cookie, just like a sugar cookie.  I might be the last person on earth to figure this out, but that's okay, I still haven't seen Avatar, I am used to it.  I did just watch Zombieland this weekend, it was a riot!

Friday, May 7, 2010

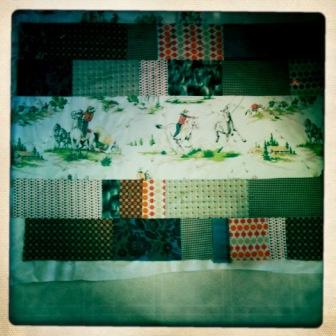
cowboy quilt


I did finish this.  Last weekend, I swear, before I started the etsy madness.  One quilt down, one to go.  I will probably have to go into Reno to find the chunky muslin for the reverse, or just use the buttery soft Kona muslin I was saving for my quilt (and save myself the money from browsing my favorite store).


The large orange dots are from Denyse Schmidt, I also have the yellow dot colorway and I think I will use that for Hunter's quilt.  It won't change the overall look, but will tie in the yellow quilt binding he picked out.  My littlest mini man chose his favorite color, and it is yellow. The big guy's fave has been blue since I don't know when, and I have been hinting for Hunter's to be red or lately I just get two blues to save an arguement.  So yellow...how perfectly fabulous and fitting to his personality.

Tuesday, April 27, 2010

cowboy quilts

I am almost finished with Henry's quilt.  It is layered, pinned and folded awaiting quilting.  The plan is to do simple long channels on the cowboy sections and similar width, but alternating directions, for each of the smaller squares.  I think quilting is the hardest part of quilting.  Well, its not particularly hard (especially if you ONLY do straight stitches, like me) just very dull.  I find it more satisfying to get the top all sewn together.  Then you can truly see your quilt for the first time.

I have seen gorgeous hand quilted works of art and am amazed, not only by their beauty in design, but awestruck by the patience involved.  Someday, I want to make one.  I also have a goal to make a quilt with a bagillion little squares like you see at department stores.  So far, I have penciled in that project for when the shortest goes to kindergarten.  I figure I deserve 6 months after they are both in school to hobby vacation & sleep.  Ahhhh...

I thought I would walk you through the steps I did for this quilt.  It is extremely easy, and if you put all the minutes together, without major disruptions, it honestly only took 2 -3 hours, tops.

First, I am making 2 toddler (crib) size quilts. The directions below are for ONE quilt. I measured our "moo-moo" bedspread (aka Cars movie, kids used to say "moo-moo" for movie, and it was the only one they would watch, I have it memorized beginning to end), and determined I needed about 54" x 43", give or take. 

1.  I used my rotary cutter and board to cut two 12" strips from the twin sized vintage cowboy sheet. I left the full width so I could line up the cowboy pics to my liking.

2.  Then, I cut 6" strips, cheating by first folding the fabric in half, selvedge to selvedge, of the coordinating fabrics. I cut two strips each of the main colors I wanted to use and only one for my accent color.

3.  I took each strip and cut them in various lengths.  12", 10", 6", 5", 4", 3".  I didn't really think about it.  I did plan to use some of the 6", rotated 90 degrees so I could have the pattern going left to right, instead of up and down. As long as I had some of the larger strips, I could always shorten them, if needed.

4.  I measured out about 44" and started laying out the gene stripes.  Mix and match, switcheroo, I changed it around until I was happy.  Then I took a picture, just in case something goes crazy awry, so I can always look back.

5.  I gathered each piece of stripe from left to right, and clipped them together as a row. Then, I stacked the rows from top to bottom.

6.  I took each pile, and sewed the pieces together, right sides together with a half inch seam allowance, forming the row.  I did this for each, keeping them in order from top to bottom.

7. Moving to the ironing board, taking each row individually and flipping over, wrong side up. I ironed each of the seams open.
8.  Then I took the first two rows and placed them right sides together, sewing the two rows together to form one wide row. I repeated this for each pair of rows, making 3 large rows (top, middle, and bottom.)
9. Pressed the seams out (just like #7) for each row.

10. I took the bottom row and placed it on my dining room table. I let the fabric slightly overhang the edge.  Above the row, I added the cowboy panel, lining up the cowboy pics as I wanted them. 

Then, I flipped the cowboy row down over the bottom row.
11.  Sewed the two rows together.  I returned the sewn bottom section to the table, lined it up and added the middle row.  Sewed together. Then, the top cowboy panel, and finally the top row.
12.  I trimmed the excess fabric from the cowboy panels.  I ironed all the seams away from the cowboy panels and towards the gene striped rows.  It was my personal preference, since the cowboy fabric was light ivory and I just don't like seeing the seams under the fabric.

13.  Now the fun part.  I had a large piece of chunky nubby muslin (very cowboy, no?) just under two yards long, and I only needed about 54", so I totally lucked out, yay.  Since it was just regular width (44/45") it was perfect, no sewing required.  I swept my kitchen floor, laid out the muslin wrong side up, laid out a pack of crib sized batting (45" x 60", 80/20 cotton/poly blend) on top, and then laid on the quilt top, right side up. 

14.  I carefully flattened it out and pinned the cannoli out of it.  Yep, the key to good quilting is safety pinning all three layers together, from the center out.  I put pins almost every 5" inches, just so it doesn't move at all, other wise my quilts end up getting wrinkled at some point. 

The next step will be quilting all of the seams of each "box."
Well, that's only how far I have gotten.  Its been waiting for me to quilt it since Saturday, I hope to have it (and its cohort) finished this weekend.