Showing posts with label cookies. Show all posts

Sunday, August 7, 2011

DIY EDIBLE BUNTING AND CUPCAKE FLAGS

 
Happy Monday! 
Here is a little DIY that has been sitting around for a bit. I thought I'd give you a little treat to start this week! These are basically just cookie pops or cookies on string dipped in melted candy wafers. Make them in any color or shape.  Keep your eyes peeled 'cause I am going to make these in another shape for a shoot later on in the next few weeks!

Supplies: baking twine

lollipop sticks or wood drink stirrers
knife
small dish of water
cookie dough
candy melts (I used Wilton)

Prepare cookie dough (my favorite is by THE DECORATED COOKIE) and chill as directed. 

Preheat oven to 350. Cut out a flag template from a piece of paper. Roll dough to 1/4”  thick and cut a straight line with a knife down the center of the dough.

Place template even with line, and cut flag. Move down the line to cut another flag.  This will make a perfect flag between the two places you made the template at. Continue down the line.  Once you are done with that side, cut another straight line down the other side to complete the second set of flags.  Continue until all flags are cut out.


For topper flags:

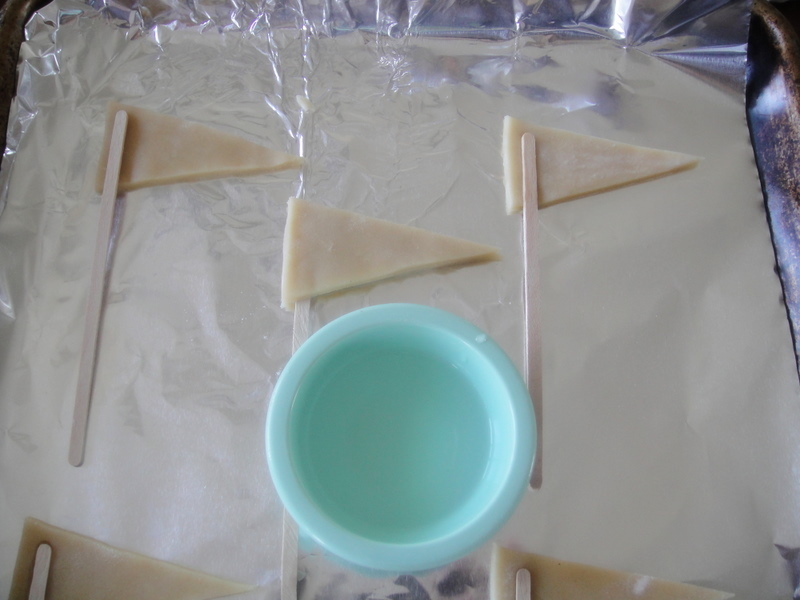
Place flags on baking sheet, leaving room between each for the length of the stick. Very gently pres sticks in each cookie, about 1/4" from the edge, as shown. Do not press all the way through. Using your finger, lightly we each flag's entire surface. Place a second flag on top of each and lightly press down.  The second flag will stick to the first, use your finger to smooth edges and sides so it looks like one cookie. 

Once all cookies are cool, melt candy in microwave, per package's instructions, in a small to medium size bowl.

Take each cookie by the stick and dip in the melted candy.  Gently tap on the side of the bowl to remove excess.  Place on a foil lined baking sheet.  Let harden or accelerate by cooling in the fridge for 15 mins. 


For bunting flags:

Place flags in a line, about 1 to 1 1/2” apart. Center a piece of twine, 20” long or length desired, on the flags about 1/4” from the top edge and gently press down.
Using your finger, lightly wet each flag’s entire surface. Place a second flag on top of each and lightly press down.  The second flag will stick to the first, use your finger to smooth edges and sides. so it looks like one cookie.

Bake for 8-12 mins, depending on your oven. Take out when just barely golden brown. Let cool.


Coating:
Once all cookies are cool, melt candy in microwave, per package’s instructions, in a small to medium size bowl.

Place cookie bunting on a wire cooling rack over wax paper to catch the drippings. Using a spoon, cover the top of each cookie, gently guiding with the spoon to cover the sides.  
After each 2 or 3, depending on how fast you work, lift the wire rack by one side and tap to smooth the candy coating and remove the excess. Lift the bunting by each end of the twine, and place on a foil lined baking sheet.  Refrigerate for 15 mins.
Once hardened, flip over cookies and place on cooling rack over wax paper again.
Dip the spoon in the candy (which might need to be remelted slightly) and using the back of the spoon to smooth, make a thin coating on the back of the cookie. Clean up with a finger any excess drips down the sides. Place newly coated side up on the foil lined baking sheet. Continue with all bunting.  If you wanted you could skip this step all together, or do it before coating the top.

Finishing: 
Once all the flags have hardened, you can clean up any edges by gently smoothing with your fingers.


Wednesday, April 20, 2011

Funny Bunny Cookies

So, I finally remembered to pull out an old recipe for Easter...this one I've had since I was a kid.  I love the FUNNY BUNNY font and I am saving it in my memory to practice lettering styles in AI. 
I went through my stash of my mom's old recipe cards.  I love the photo styling, right? right? I think this is early 80s, you know when everything was still kind of 70s, before new wave hit...
I would have bet money it was a Pillsbury recipe, but I guess not. *I tried this with Pillsbury dough, but it spread into giant chubby bunnies, so big the boys couldn't eat it all.* Here's a picture, it's too funny not to include.
I guess that's what I get for being lazy and not making my own...

When I redid this, I used the best ever cookie dough recipe from Meaghan, over at The Decorated Cookie.  It works every time, doesn't spread one bit, and tastes yummy.  I rolled the dough in waxed paper to chill.  Then I just sliced a bunch of 1/2" circles, cut some of them in half.
Place a circle on the baking sheet and add two halves on top, for the ears.  Smooth the line slightly with your fingers. Bake.  To decorate, I lined the cookies with white royal icing, also from Meaghan, and sprinkled with nonpareils.  Then, I drew an x and stuck a pink jelly bean in the cross for the nose and whiskers.  I added two candy eyes that I have from Bake It Pretty and voila.  Easy.  Not quite as kitchy as the original, but just as yummy.

Wednesday, March 16, 2011

Cookie Cutter Round-up


US COOKIE CUTTER {BAKE IT PRETTY}
 I promise there are lots of goodies coming next week.  For now, more shopping round-ups...I am loving how fast I can find things with awesome internet speeds.  Above, the USA cookie cutter would make the cutest Save the Date!  Just put a little dot on your city and date it with icing! 


{SOURCES}
AMPERSAND, ANTLERS, AND BALLOON (this on a STICK, as a cookie pop...AWESOME!) from FANCY FLOURS

Thursday, February 24, 2011

A little treat...


Hello lovelies! I just wanted to pop in and say I'm sorry for the lack of posts, our house got hit with one heck of a cold. So, not only are we all sick, but with BOTH kids home ALL day...my productivity levels take a hit.  But on a sweeter note...I have found an INCREDIBLE chocolate chip cookie recipe.  My brother, has been gluten free for a while and insists that his overall health and energy levels have improved.  The funny thing is, as far as health stuff is concerned (and perfume/cologne) we are pretty much on the same boat.  So, for the past week, I have been trying gluten free...and honestly it's not that hard but I can't tell you about energy levels because we're all sick as a dog. But I also don't feel deprived.  Especially, not with these in the house.

My twitter lovelies helped me find some fabulous GF sites and I want to give a big hug to Lisa from With Style and Grace, who's recommendations led me to these cookies over on gluten-freelicious.  **I also made Lisa's recipe for GF Pumpkin Bread and oh dear heaven... I made it twice last weekend, it didn't survive for the photoshoot.

Now, this recipe really is AWESOME.  Like forget the gluten-free part...it makes a fab cookie.  I used mini chocolate chips, because I enjoy even distribution of smaller amounts of chocolate. I would rank it overall SECOND BEST, because these are still my #1 FAVORITE.

Monday, September 13, 2010

Almond Butter Cookies


I am happy to say my little recipe experiment worked.  Since Hunter is allergic to peanuts, I was wondering if I could use other nut butters in various recipes.  I finally found an almond butter that was not made on the same machines as peanuts, and it happens to be the Blue Diamond brand, which is the only nuts we could find not made with peanuts. **Note - the nuts and butters from Blue Diamond are made on the same equipment as other tree nuts. We tried dipping celery in almond butter, no luck.  We tried it spread on toast, no luck.  Hunter can be incredibly picky at times, and since he's never had a peanut butter sandwich, he doesn't get the whole texture thing, which is a smidge less creamy in the almond butter.

So, I moved on to cookies.  Macarons are made from almonds, we like spritz cookies with almond flavoring, why not try almond butter cookies? It should be easy, and it was.  I took my favorite peanut butter cookie recipe and substituted almond butter for the peanut butter.  The hubby and both mini men are quite happy.  I know for sure that the hubby isn't just being nice because he stole the bag of remaining cookies and took it with him.

Here's the recipe, adapted from The Good Housekeeping Cookbook.
1 1/4 cups flour
1 tsp baking soda
1/4 tsp salt
1 cup creamy almond butter
1/2 cup softened unsalted butter (1 stick)
1/2 cup packed brown sugar
1/4 cup granulated sugar
1 large egg
1/2 tsp vanilla
1 cup powdered sugar (optional, I did this even though it's not in the original recipe)

Preheat oven to 350 degrees.  Mix together butter, sugars, egg, almond butter, and vanilla.  In a small bowl, blend flour, salt and baking soda.  Add flour mixture to butter mix. Mix until thouroghly combined. 
Scoop out by rounded teaspoon size and roll in a small bowl of powdered sugar before baking. Press down the tops to flatten slightly. Bake for 15 - 20 mins.  Cool on a wire rack and enjoy, with milk was the preference at our house.

Another option for finishing the cookies is to add white chocolate chips to the mixture.  These were Henry's favorite.

Monday, May 24, 2010

my new tractor seat & divine chocolate cookies


Hello darlings! I still hold my apprehensions towards Mondays, even though every day is Saturday to me...Mondays still hurt. This was by far the BEST Monday in forever.  I shall explain...
Saturday was my long awaited "day off" and I cruised the two community yard sales along the loneliest road in America, HWY 50.  Well, there were only two anywhere near me, even though I am sure other locations on the coast to coast yard sale were better.  I did not end up in California as hoped, b/c my poor little car is now 100K miles old! Happy Birthday Little Maudinator aka "the focus."  These two little sales were not as bountiful as I had hoped.  Regardless, I had a pretty cool day off flitting around the library and bookstores.  Ahhh...all without the boys. Little luxuries, if you have ever been to a book store anyone under 5 and tried to look at anything NOT in the kids section, you feel my pain. 

My disappointment in yardsales was discarded this evening when my hubby came home with this lovely vintage tractor seat from work! Thank you! Thank you!  Soon, my lovely, you will be a delightful stool, courtesy of my metal working loverboy.  Yippee!  I will post pics when she's all done.

And the SECOND reason I love Mondays, well this one, is gooeyness and yumminess. 
Last weekend, Ms. Dylan made her sis-n-law's bbq brownie madness (see here, scroll to the bottom for the brownie recipe.) Alas, the shortest of my clan is allergic to peanuts.  Phooey.  While craving them, and simultaneously cruising the baking aisle at the grocery store...I saw a box of Ghirardelli Walnut Brownie Mix. On the back of the box was a recipe for Chocolate Overload Cookies...oh dear...with white chocolate & semi-sweet chips added to the mix...the mix that has walnuts already.  YUM!  Add one jar of marshmallow cream...can you see where I am going with this?  Bake the cookies, while still warm, take two cookies and add a heaping dollup of cream between them.  Let melt and goo up.  Eat with fork.  I still dream of her PBcup/marshmallow/brownie goodness but, this was pretty darn good, and best of all, Hunter loved it.

Monday, May 10, 2010

can you put sprinkles on chocolate chip cookies?

Yes.  Yes, you can.  I am starting to think you can put sprinkles on anything.  It was Mother's Day weekend, what is with all the red, white and blue, you ask...well, it was my boys' best friend, WD's birthday party on Saturday.  I made him a special birthday boy garland, which we girls love, but (note to self) I still need to boy it up a bit.  It was darn cute though.  I found two of the cutest pillowcases at the thrift store, in the classic reds and blues that are those wonderful vintage colors from way back when.  I had to have them for garland. 
I paired the vintage strips with bleached muslin and made them slightly smaller in width than the standard garlands. The recovered fabric made three total garlands, one for Willie (well, really Ms. Dylan), and two more, of which are so darn cute I'm not sure if I will part with them.  But, maybe if you ask really nice, I will sell or even giveaway one for Memorial Day. 

Anyhoo...back to the cookies...I took my trusty Mrs. Fields cookie recipe here, and used my 1" cookie scoop, and rolled the tops of each scoop into a plastic tub of patriotic sprinkles ala Target. 

Gosh, I love the dollar bin.  I should do a post about the wonders of the Target dollar bin, it's like the dollar store, but filled with stuff you actually want.  The same can be said for the Michaels dollar aisle...I digress...again. 
Cook exactly like you would sans sprinkles.  Voila, and yes, they were delicious.  I learned that you can decorate a chocolate chip cookie, just like a sugar cookie.  I might be the last person on earth to figure this out, but that's okay, I still haven't seen Avatar, I am used to it.  I did just watch Zombieland this weekend, it was a riot!

Monday, April 12, 2010

Macarons, take two...


Still loving my I Love Macarons book (see previous post) I tried these first at the inlaws in Seattle.  Something went wrong and they were all runny and flat like pancakes.  So, now were back in Nevada and they puffed up and formed the pied (little foot).  Fabulous. So I tried to make the buttercream recipe from the book. Not so fabulous. 
There is a part about making a sugar syrup in the microwave.  One minute, fine, stir, fine, nuke for 4 more mins, uh oh.  At about 2 mins 35 seconds, whats that smell??? Open the door, sizzling black sugared liquid boiling away in puffs of smoke.  I grabbed a towel, ran it out to the backyard and tossed the gunk and the bowl behind the garden bed with no garden. Back to reread the directions. Ahhhhh.  Her microwave is 500 watts.  Hmmmmm... oh, mine is 1300.  Note to self...read twice, cook once.  So after another attempt at the icing in the book, I quit, dumped the experiment in the sink and made some shortening based chemical frosting.  Delish!  Pretty sure chemical frosting does not belong in the french delicacy world but hey, oh well.  Its my kind of pastry, little bit trashy but super sweet, like me.
 

Tuesday, January 19, 2010

it works!!!


So after being terribly disappointed in my brownie molds, I got these cookie cutters from Williams Sonoma. You can make them say anything you want, are cute shapes even without words, and I figured they would have a firm cookie dough recipe - if it works for words...it's gotta work for button holes, right?
So, I tried and MINE WORKED TOO!!! Just like the box, albeit not as pretty but I didn't decorate, the lighting was bad...this was a test, just a test. I also tested my button shapes, and THEY WORKED TOO! (but I burnt the edges so no pictures, will try again later.)

Thursday, January 14, 2010

pretty food

I have never had a white chocolate pretzel. Maybe the yogurt kind, but I don't remember. Divine. A perfect food, sweet and salty, smooth and crunchy. Satisfying. Did I mention pretty? How lovely will these look on the buffet in a pretty glass?


Here is my first attempt at Martha's button cookies. I used Pillsbury Sugar Cookie dough in a tube, and cut out the cookie with a round cutter, imprinted the inner ring with the next size down, and made the button holes with a sippy cup straw (they are fatter than the average bendy straw.) When I baked them, they puffed up alot and closed the holes. I mended this by cooling for two minutes and then recutting the holes with the sippy straw. I need to find a firmer cookie dough, I think. Or maybe chilling the dough right before putting in the oven will work.
Oh - did you notice my giant green button? Woo Hoo - was at a different fabric shop from my usual, a quarter each - I got eight. It is huge- those are regular sized cookies!

I have made two attempts at pretty brownie pops. My new mold (thank heavens I just paid $5 for it) doesn't like me. Or actually doesn't like my brownies, or liked them so much it didn't want to let them go. Messy, messy, messy. No photo of that catastrophe, its depressing...

the BEST chocolate chip cookies ever - classic style


These cookies are not helping my new years resolutions. But the boys love making them, and I love eating them. They turn out perfect every time, use salted butter (always have in the fridge), and are always soft and chewy (quite a feat considering I am cooking them, and in the desert.) Here's the recipe - you have to try it out. Its from Mrs.Fields Cookie Book, by yes, that Mrs. Fields.


Blue-Ribbon Chocolate Chip Cookies
2 1/2 cups all-purpose flour
1 tsp. baking soda
1/4 tsp. salt
1 cup dark brown sugar, firmly packed
1/2 cup white sugar
1 cup salted butter, softened
2 large eggs
2 tsp. pure vanilla extract
2 ups (12 oz.) semisweet chocolate chips (I use milk chocolate)


Preheat oven to 300 degrees.
In medium bowl combine flour, soda and salt. Mix well with wire whisk. Set aside.
In a large bowl with an electric mixer blend sugars at medium speed. Add butter and mix to form a grainy paste, scraping down the sides of the bowl. Add eggs and vanilla extract, and mix at medium speed until just blended. Do not overmix.
Add the flour mixture and chocolate chips, and blend at lo sped until fully combined. Do not overmix.
Drop by rounded tablespoons (I use a small cookie scoop) onto an ungreased cookie sheet, 2 inches apart. Bake 18-22 minutes or until golden brown. Transfer cookies immediately to a cool surface with a spatula.
YUM!